
The API and website code mismatch is a common issue. It stems from different approaches to managing state and displaying components. Especially when it comes to complex APIs like our JavaScript API.
Developers often have to solve this problem on their own by writing extensive additional code. However, it’s not always the most effective way. The code becomes more and more complex, performance deteriorates, and response time increases. This can lead to user dissatisfaction.
To prevent it, we create wrappers for popular frameworks and libraries. Now, let’s take a look at how we did this, using the integration of the JavaScript API with React and Vue as an example. Later on, we plan to apply this approach to other popular frameworks such as Svelte, Angular, and SolidJS.
Popular ways to solve the integration problem
There are many ways to achieve this, but after examining the majority of them, we have identified two that are the most popular and versatile. We tested both.
Method 1: Creating individual components for each API entity
This method is the simplest. In the selected framework, we create a component for a class from our JavaScript API. The component has the same name as the class and internally creates an instance of the class.
For instance, we created two components: <MMap> and <MMapDefaultSchemeLayer>. The first one synchronizes the state and data interface with the instance of mappable.MMap. The second one synchronizes with the instance of mappable.MMapDefaultSchemeLayer. This needs to be repeated for each public class.
import { useRef, useEffect, useContext } from "react";

// Context for getting a map instance from any child component
const MapContext = React.createContext(null);

//  The component that contains MMap creates a map on the page
const MMap = () => {
  const ref = useRef();
  const map = useRef();
  useEffect(() => {
    mappable.ready.then(() => {
      map.current = new mappable.MMap(ref.current, { location: LOCATION });
    });
  });
  return (
    <MapContext value={map.current}>
      <div ref={ref} id="app"></div>;
    </MapContext>
  );
};

// Default layer component
const MMapDefaultSchemeLayer = () => {
  // Gets the map instance via the context
  const map = useContext(MapContext);
  useEffect(() => {
    mappable.ready.then(() => {
      const layer = new mappable.MMapDefaultSchemeLayer();
      // Adds the created layer to the map
      map.addChild(layer);
    });
  });
  return <></>;
};

// An example of an app using this approach
const App = () => {
  return (
    <MMap>
      <MMapDefaultSchemeLayer />
    </MMap>
  );
This method is simple and provides the benefit of using imperative JS API classes as declarative components of frameworks. Still, it has its cons.
When you introduce a new entity to the JS API, you need to write code for a new component. If an entity is changed in the JS API, you need to transfer the changes to the already created integration code. Things get even more complicated when a project uses two frameworks instead of one.
Another less obvious disadvantage is that there are third-party packages for the JS API that are not part of the core module. For example, we may have the zoom control in a separate package that’s created by a third-party developer.
At this point, numerous questions arise:
- How do we create a framework component for this control?
- Should we integrate with a separate “@mappable-world/mappable-control-react?” package?
- Can we leave the implementation to the developer who uses the JS API, the @mappable-world/mappable-control package, and, for example, React?
In addition, we get a lot of inconvenience with code duplication and the need to support multiple code bases. It also becomes challenging to maintain compatibility for integrations with third-party packages from other developers.
Method 2: Creating a wrapper component
We wait for all the bundles to load before adding the map to the app. To do this, we create a wrapper component that stores all the logic of loading and displaying the loading state: spinners, progress bars, and so on.
This way, all child components placed inside this wrapper can be assured that the JS API is ready for use.
Example in React:
import { ReactElement, ReactNode, useEffect, useState, useRef } from "react";

type WrapperProps = {
  children?: ReactNode;
  loadingElement?: ReactElement;
  failElement?: ReactElement;
};

// Wrapper component that internally implements the logic for loading the JS API
const MMaps3Wrapper = ({
  children,
  loadingElement,
  failElement,
}: WrapperProps) => {
  const [status, setStatus] = useState("loading");
  useEffect(() => {
    mappable.ready
      .then(() => setStatus("success"))
      .catch(() => setStatus("fail"));
  });

  // Displaying the contents of the map
  if (status === "success" && children) {
    return children;
  }
  // Displaying the loading process
  if (status === "loading" && loadingElement) {
    return loadingElement;
  }
  // Displaying the JS API loading error
  if (status === "fail" && failElement) {
    return failElement;
  }
  return <></>;
};

// An example of an app using this approach
const MapComponent = () => {
  const ref = useRef();
  const map = useRef();
  useEffect(() => {
    map.current = new mappable.MMap(ref.current, { location: LOCATION });
  });
  return <div ref={ref} id="app"></div>;
};

const App = () => {
  return (
    <MMaps3Wrapper loadingElement={<div>Loading</div>}>
      <MapComponent />
    </MMaps3Wrapper>
  );
};
In the app, you can now separate the logic of working with the map into different components, passing data and context using the tools of a specific framework. But regular JS API classes will still be used internally.
Our choice
In our case, it seemed that the first method was better. Using imperative entities as declarative ones was more convenient for developers.
So we used this approach in the early stages of developing the JS API — we created components for React.
However, as we gained more experience with our API, we realized that expanding the codebase significantly for integration, especially when we intended to support more than just React, wasn’t the best approach. We therefore wanted to find some mechanism to automatically convert imperative classes into the components of the needed framework.
We needed a transformation mechanism:
Such an approach could solve the problem of supporting third-party packages, as the mechanism would be the same for all classes.
How to create a transformation
In the JS API, the map works as a virtual tree. It consists of various entities: a map, markers, layers, controls, and more. These entities interact via one connection system: parent-child. We call it an entity system.
To create a transformation into framework components, you need to develop a mechanism that converts the virtual map tree into the component tree of the desired framework. This mechanism should be able to interpret data about entities and their relationships in a tree, and then create corresponding components.
This can be implemented as a special module that works in conjunction with the JS API and the selected framework. As a result, developers will be able to use convenient tools for working with the map without losing access to the capabilities of the chosen framework.
About the entity system
You can think of an entity as a component of any framework. It’s a basic structural unit that provides functionality and interacts with users through the app interface. We have entities divided into four types:
- Entity — a basic entity
- Complex Entity — can have a child subtree, but doesn’t have a public interface to interact with it
- Group Entity — similar to a Complex Entity, but has a public interface to interact with its own subtree
- Root Entity — main entity of the map. Otherwise similar to the Group Entity
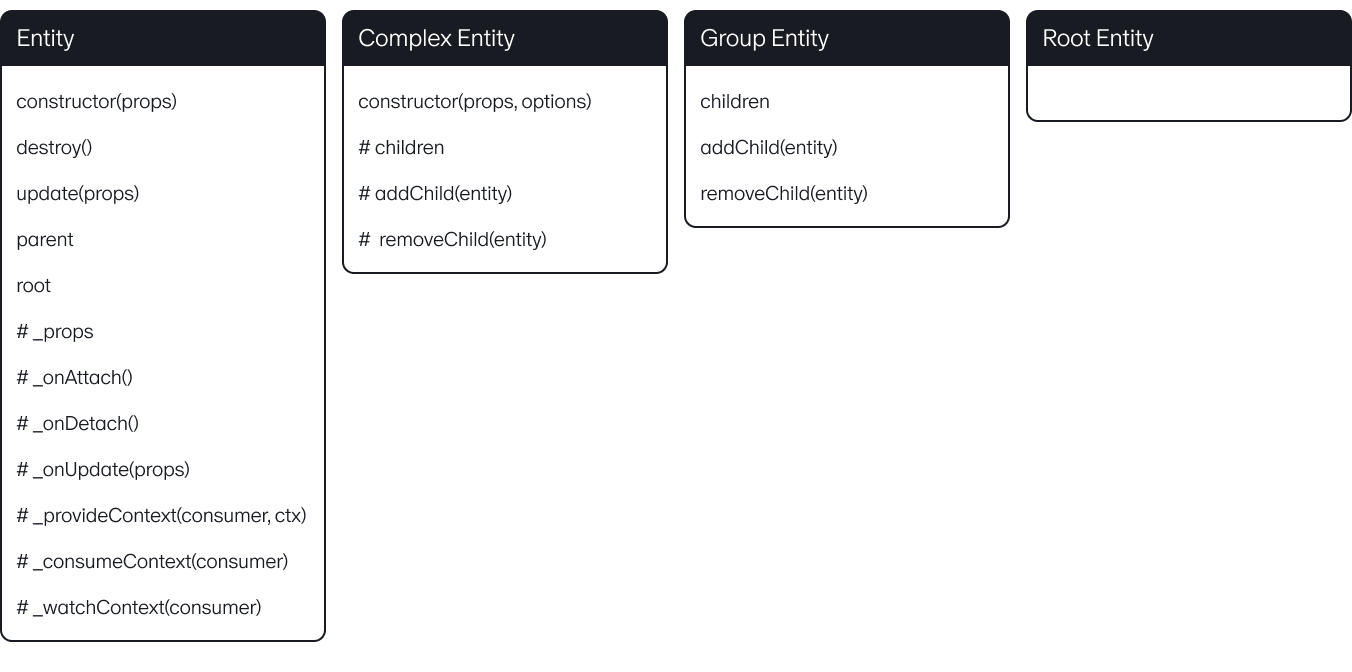
Each type represents an abstract class that is hierarchically inherited from another type. In other words, each type is an extended version of its parent.
That said, the Complex Entity extends the functionality of the basic Entity by adding the ability to have a subtree of child entities. The Group Entity extends the functionality of the Complex Entity by making the methods for adding and removing items in the internal subtree public. The Root Entity is an extended version of Group Entity that removes the possibility of being added to another subtree.
You can say that each entity has a common “framework” on which it is built. It is based on this “framework” that the transformation into framework components occurs.
Attempt 1: Reactify
The first framework we chose to integrate with in this manner was React.
First, let’s create a primitive function called reactifyEntity. It takes a class constructor of the entity and a name of the future component (by default, it’s the same as the entity class) as arguments and returns a React component:
function reactifyEntity<TEntity extends GenericEntity<unknown>>(
  ctor: EntityConstructor<TEntity>,
  displayName = ctor.name
) {
  const component = (props, ref) => {
    const entityRef = React.useRef<TEntity>();

    React.useEffect(() => {
      const entity = new ctor(props);
      entityRef.current = entity;
    });

    React.useEffect(() => {
      entityRef.current.update(props);
    }, [props]);

    return <>{props.children}</>;
  };

  component.displayName = displayName;
  return component;
}
As we can see, a component is created with an entity inside it. The entity gets its parameters (props) through the component’s parameters. So far it looks simple, but the question is how the entities will later interact with each other. In this implementation, they are isolated. They need to be connected.
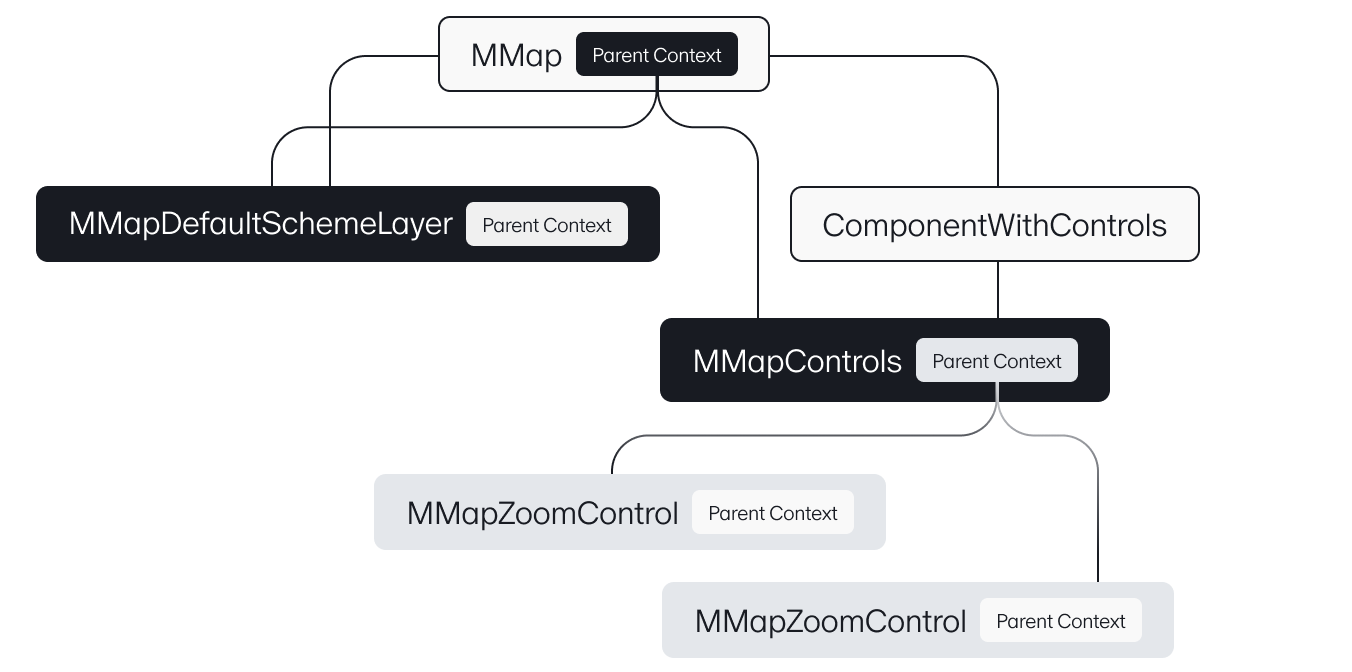
This is where React Context comes in handy. Each component with an entity will have its own context, and all child components will know their parent. This also means that the structure of the React virtual tree will match that of the map entity system.
Since React initializes all its components starting from the root element and going down the hierarchy of the tree, we get the following sequence of actions:
- We add a component with an entity, and the component provides its own context.
- Its child component receives its parent through the context and sends the parent an add request.
- The parent entity receives the request and adds a new child element.
Similarly, if a component is removed from the virtual tree, a request is sent to remove it from the parent.
The use of context enables entities to avoid being direct children of the parent. For example, we can group all the controls into one ComponentWithControls component and add it to the map. Nested controls will have access to the parent entity anyway.
Let’s modify the reactifyEntity function taking into account the changes mentioned above:
function reactifyEntity<TEntity extends GenericEntity<unknown>>(
  ctor: EntityConstructor<TEntity>,
  displayName = ctor.name
) {
  const component = (props, ref) => {
    const entityRef = React.useRef<TEntity>();

    React.useEffect(() => {
      const entity = new ctor(props);
      entityRef.current = entity;
    });

    useParent(entityRef, ctor); //  parent "search" hook

    React.useEffect(() => {
      entityRef.current.update(props);
    }, [props]);

    const parentCtx = useParenting(entityRef); //  hook for creating parent context
    return (
      <ReactParent.Provider value={parentCtx}>
        {props.children}
      </ReactParent.Provider>
    ); // hook for creating parent context
  };

  component.displayName = displayName;
  return component;
}
Let’s take a closer look at two new hooks:
useParent — the tile’s y-coordinate as an integer
useParenting — creates context for the current entity in the form of an object that contains a reference to the entity and methods for sending add and delete requests.
This way, we managed to connect the entities together and now they’re not isolated from each other in the components.
But let’s imagine a situation when we have the following React virtual tree template in our app:
function App() {
  const [show, toggleShow] = React.useState(true);
  return (
    <>
      <div className="toolbar">
        <button type="button" onClick={() => toggleShow(!show)}>
          {show ? "Delete zoom control" : "Create zoom control"}
        </button>
      </div>

      <MMap location={LOCATION}>
        <MMapDefaultSchemeLayer />
        <MMapControls position="right">
          {show && <MMapZoomControl />}
          <MMapGeolocationControl />
        </MMapControls>
      </MMap>
    </>
  );
}
Initially, the controls are rendered in the following order: MMapZoomControl, MMapGeolocationControl. But what if we hide the MMapZoomControl and show it again later? Why does the display order change and MMapGeolocationControl is rendered first, followed by MMapZoomControl?
The thing is, we’re not taking the order of the elements into account. When we hid MMapZoomControl, it was removed from the parent entity, and when we showed it again, it was added to the end of the subtree. That’s why it was initially at the beginning and then ended up at the end.
Keeping the right order of elements
To ensure the correct order, we need to use reconciliation — a mechanism for aligning and synchronizing changes in one tree with another. It’ll synchronize the order of elements in the entity system with the order in the React virtual tree.
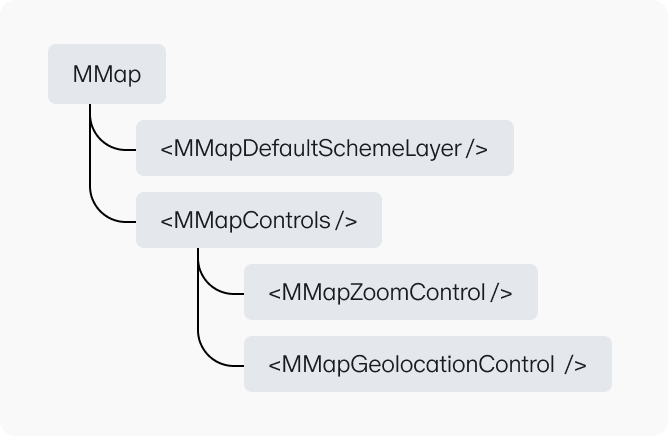
Keep in mind that the entity system is managed through the React component tree, not the other way around. For example, we describe the structure of the map in React, and a tree is created in the entity system based on this structure. They’re the same at the initialization stage:


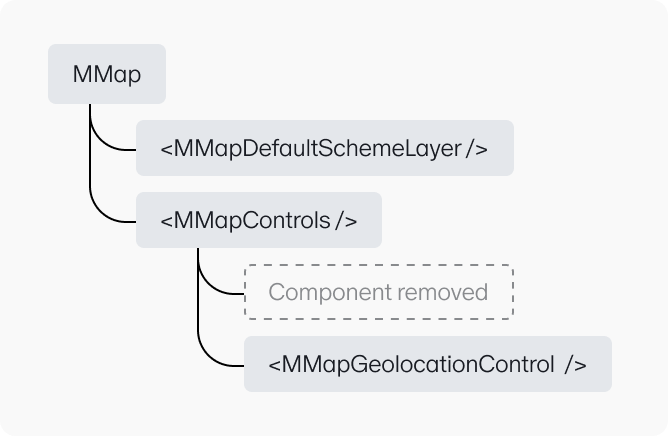
When we dynamically remove some component (for example, when we press a button to hide MMapZoomControl), the component will first disappear from the React tree:
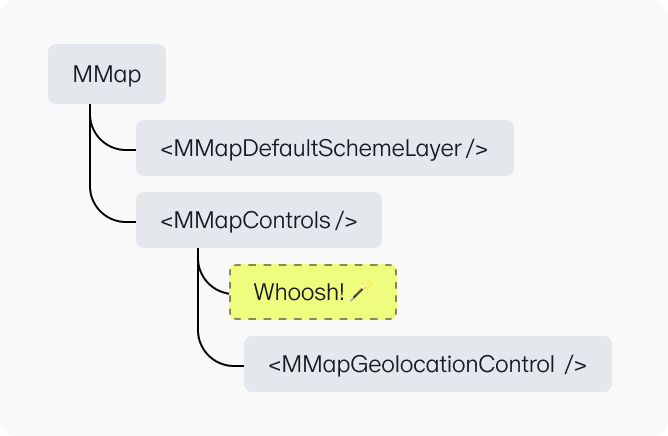
Then, the entity inside this component will request for deletion from the parent, which will remove it from the entity system:

If we return MMapZoomControl (dynamically again), it will first appear as a component in React, and then in the entity system.
This is a one-way mechanism. If you delete an entity directly from the entity tree, these changes won’t be reflected in the React component tree.
But let’s get back to the order of the elements. Since only parent entities can remove entities from the tree, they’ll be responsible for maintaining the order of their child elements. So, we need to get a list of its children components from React — this will be the current order. In the entity system, you can get child elements using the children property — this will be the actual order.
Now, let’s introduce a reconciliation method that aligns the actual order with the current one:
// parent — The parent entity
// childrenRef — List of child entities from the React tree (current state)
const reconciliation = (
  parent: GenericEntity<unknown>,
  childrenRef: GenericEntity<unknown>[]
): void => {
  if (!(parentRef instanceof GenericGroupEntity)) {
    // // Only "Group Entity" can publicly modify child entities
    return;
  }
  const real = parentRef.children;

  // In the first cycle, we add entities to the needed places according to the current state
  for (let i = 0; i < childrenRef.length && i < real.length; i++) {
    const current = childrenRef[i];
    if (current && current !== real[i]) {
      parentRef.addChild(current, i);
    }
  }

  // In the second cycle, we remove unnecessary entities
  for (let i = real.length - 1; i >= childrenRef.length; i--) {
    parentRef.removeChild(real[i]);
  }

  // In the third cycle, we add new entities
  for (let i = real.length; i < childrenRef.length; i++) {
    const current = childrenRef[i];
    current && parentRef.addChild(current);
  }
};
This method will replace two separate delete and add requests inside the useParenting hook, as it will handle the addition or deletion itself when necessary. To bring child React components in line with entities, we can use the useParenting and useParent hooks.
Every time the structure of the component tree changes in React, these hooks will be triggered. In each call of the useParent hook, we will send a signal to the parent entity indicating the presence of a component with an entity. All signals will come to useParenting and be added to a special array corresponding to the current order of elements in the React tree.
Let’s modify the code of the reactifyEntity method so that it can maintain the correct order of elements:
 function reactifyEntity<TEntity extends GenericEntity<unknown>>(
  ctor: EntityConstructor<TEntity>,
  displayName = ctor.name
) {
  const component = (props) => {
    const entityRef = React.useRef<TEntity>();

    React.useEffect(() => {
      const entity = new ctor(props);
      entityRef.current = entity;
    });

    useParent(entityRef, ctor); // gets its parent and will send signals to it about the presence or absence of a component in the React tree

    React.useEffect(() => {
      entityRef.current.update(props);
    }, [props]);

   // useParenting now tracks the correct order of elements
    const parentCtx = useParenting(entityRef); // now parentCtx contains the "reconciliation" method instead of delete and add requests
    return (
      <ReactParent.Provider value={parentCtx}>
        {props.children}
      </ReactParent.Provider>
    );
  };

  component.displayName = displayName;
  return component;
}
If you dynamically change the order of components in React after these modifications, they will correctly reflect these changes in the entity system.
Binding a component to the DOM
Some JS API entities can accept a DOM element. This lets you add custom buttons, tooltips, pop-ups, and much more to the map. For example, let’s add a custom button to the map:
// Creating a new HTMLElement in JS
const element = document.createElement("div");
element.style.color = "#196dff";
element.style.fontWeight = "bold";
element.textContent = "Button with element";

// Passing it to the entity as "props"
const elementButton = new MMapControlButton({ element });

// Adding to the map
map.addChild(
  new MMapControls({ position: "top right" }).addChild(elementButton)
);
How it works in the entity system
To bind a DOM element to the entity, the entity should contain a DomContext, which creates a connection between the entity and the DOM element. It also determines where to insert DOM elements of child entities. We use the useDomContext hook to create a DomContext inside the entity. Learn more in the documentation.
How to add solution support to React
You need to preserve the ability to pass a native HTMLElement through props. In this case, you don’t need to do anything else. The entity system and DomContext will take care of everything themselves. It will look like this:
function App() {
  const element = document.createElement("div");
  element.style.color = "#196dff";
  element.style.fontWeight = "bold";
  element.textContent = "Button with element";

  return (
    <>
      ...
      <MMapControlButton element={element} />
      ...
    </>
  );
}
Better, but this approach doesn’t let you create a versatile solution. The entity system doesn’t provide a single interface for connecting the DOM and the entity. While there is useDomContext, it is used differently within each entity class. That’s why we came up with the idea of providing support for custom wrapper implementations. We called them “overrides”, meaning “redefinitions”.
Override support
The transformation from entity to component was done by the reactifyEntity function. An override is essentially the same function but independently implemented by the developer.
Overrides need to be implemented in two cases:
- When the logic of the entity within the framework differs from imperative logic
- When additional logic is required for the creation of a framework component
Override example:
const MMapControlButtonReactifyOverride: CustomReactify<MMapControlButton> = (
  MMapControlButtonI, // MMapControlButton basic class
  { reactify, React, ReactDOM } // Reference to the reactify and React objects to access their methods

  // Creating a component that still accepts HTMLElement as an "element"
  const MMapControlButtonReactified = reactifyEntity(MMapControlButtonI);
  const MMapControlButtonContainer = React.forwardRef<
    GenericEntity<MMapControlButtonProps>
  >(({ children, ...props }, ref) => {
    // Creating an HTML container element
    const [controlElement] = React.useState<HTMLElement>(() =>
      document.createElement("mmaps")
    );
   // Passing the created container element as the "element"
    // After that, using React portal, we teleport React nodes from "children" to controlElement
    return (
      <MMapControlButtonReactified
        {...props}
        ref={ref}
        element={controlElement}
      >
        {ReactDOM.createPortal(children, controlElement)}
      </MMapControlButtonReactified>
    );
  });
};
What’s happening here?
The
MMapControlButtonReactifyOverridefunction takes the basic class of theMMapControlButtonIentity and references to the React and reactify objects as arguments.MMapControlButtonIis converted into theMMapControlButtonReactifiedcomponent. Since there’s no need to change the entity, the conversion is done with the basicreactifyEntitymethod. The resultingMMapControlButtonReactifiedcomponent can accept anHTMLElementas an element.The component
MMapControlButtonContaineris created, which will be a wrapper forMMapControlButtonReactified.Inside this wrapper, an internal
HTMLElement(controlElement) is created and passed as the element of theMMapControlButtonReactifiedcomponent.MMapControlButtonis now linked to controlElement, although it’s still empty. The content comes in the form of React nodes as children.This content should be placed inside the native
controlElement. This is where React Portals will help us. With its help, we can specify in which DOM element we need to render React nodes.
What remains is to connect the override with the entity and teach reactify to use the override during transformation. Let’s create a unique Symbol called overrideKeyReactify. We need it as a key inside the entity class. This key defines the value of the override.
export class MMapControlButton extends MMapComplexEntity<MMapControlButtonProps> {
  static [overrideKeyReactify] = MMapControlButtonReactifyOverride;
  ...
}
Let’s rename reactifyEntity to internalReactifyEntity. It becomes an internal implementation, while the reactifyEntity becomes a public method that looks like this:
const currentlyInOverridedReactify = new WeakSet();

function reactifyEntity<TEntity extends GenericEntity<unknown>>(
  ctor: EntityConstructor<TEntity>,
  displayName = ctor.name
) {
  const overridedReactify =
    overrideKeyReactify in ctor ? ctor[overrideKeyReactify] : null;

  if (
    overridedReactify &&
    !currentlyInOverridedReactify.has(overridedReactify)
  ) {
    try {
      currentlyInOverridedReactify.add(overridedReactify);
      return overridedReactify(ctor, {
        reactify,
        ReactParent,
        React,
        ReactDOM,
      });
    } finally {
      currentlyInOverridedReactify.delete(overridedReactify);
    }
  }
  return internalReactifyEntity(ctor, displayName);
}
The reactifyEntity method now checks if the entity has an override:
- If it does, it returns the result of the override
- If it doesn’t, it returns the result of the internal transformation function
Please note that in the MMapControlButton override we called the reactifyEntity function expecting to get the resulting internalReactifyEntity, but instead we would end up with a recursive call to the override. To prevent infinite call recursion, we added a set called currentlyInOverridedReactify, where we will store the invoked overrides. And if we get an entity with an override again, we’ll return the call to the internalReactifyEntity function.
Done!
Now we have reactify — our first wrapper for entities to be used in React. We get it as a module that we need to import into the project. The module provides methods for transforming both individual entities and the entire module at once. Here’s an example of a simple React app:
async function main() {
   // Importing reactify module
  const [mappableReactify] = await Promise.all([
    mappable.import("@mappable-world/mappable-reactify"),
    mappable.ready,
  ]);
  // Getting the reactify instance — an object with transformation methods
  const reactify = mappableReactify.reactify.bindTo(React, ReactDOM);
  // Getting reactify components of entities from the basic mappable module
  const { MMap, MMapDefaultSchemeLayer, MMapControls } =
    reactify.module(mappable);
   // Getting reactify entity components from the third-party @mappable-world/mappable-controls package
  const { MMapZoomControl } = reactify.module(
    await mappable.import("@mappable-world/mappable-controls@0.0.1")
  );

  function App() {
    const [location, setLocation] = React.useState(LOCATION); // LOCATION — object with map location data

    return (
      <MMap location={location}>
        <MMapDefaultSchemeLayer />
        <MMapControls position="right">
          <MMapZoomControl />
        </MMapControls>
      </MMap>
    );
  }

  ReactDOM.render(
    <React.StrictMode>
      <App />
    </React.StrictMode>,
    document.getElementById("app")
  );
}
Attempt 2: Vuefy
After successfully implementing the wrapper for React, we decided to test a similar approach for other popular frameworks. We decided to use Vue as the next candidate.
To integrate with Vue, we used a similar approach, but with some differences:
- We created the
vuefyEntityfunction, which converts an entity class into a Vue component - Instead of React Context, we used the Vue Provide/Inject mechanism
- Instead of React Portals, we used Vue Teleports
- The override mechanism works similarly to how it was done for React
However, there are some Vue-specific solutions that we used.
Props declaration
Vue has a mandatory requirement: when a component is created, it must declare its props. There are several ways to do this. For example, you can use an array of strings or an object, if you need to specify the type of each property. The problem is that we need to declare the same props for components as for entities, but we only have these props represented as types in TypeScript.
The first thing that comes to mind is to pass the props declaration during entity transformation. The internalVuefyEntity function (similar to internalReactifyEntity) accepts props in the format of props declarations for Vue, in addition to the entity class and displayName.
function internalVuefyEntity<TEntity extends GenericEntity<unknown>>(
  ctor: EntityConstructor<TEntity>,  // entity class
  props: VuefyPropsObject<TProps>, // declaration of props for creating a component
  displayName = ctor.name
) {
  const component: TVue.Component<TProps> = Vue.defineComponent({
    name: displayName,
    props,
    setup(props, { attrs, expose, slots }) {
      let childSlots: TVue.VNodeArrayChildren | null = null;
      const entity: TVue.Ref<InstanceType<TCtor> | null> = Vue.shallowRef(null);
      const requestReposition = () => {
        if (childSlots && entity.value) {
          reconciliation(entity.value, getChildEntities(childSlots));
        }
      };

      Vue.onMounted(() => {
        entity.value = new ctor({ ...attrs, ...props }) as InstanceType<TCtor>;
        requestReposition();
      });

      Vue.onUnmounted(() => {
        requestReposition();
      });

      Vue.onUpdated(() => {
        requestReposition();
      });

      Vue.watch(props, (newProps) => {
        entity.value?.update(newProps);
      });

      expose({ entity });
      return () => {
        childSlots = slots.default ? slots.default() : null;
        return childSlots;
      };
    },
  });

  return component;
}

// vuefyEntity expects a props declaration as an argument, which means the developer has to do it themselves:
const [mappableVue] = await Promise.all([
  mappable.import("@mappable-world/mappable-vuefy"),
  mappable.ready,
]);
const vuefy = mappableVue.vuefy.bindTo(Vue);

// Props declaration as an object
const MMapControls = vuefy.entity(mappable.MMapControls, {
  position: String,
  orientation: String,
});

// Props declaration as an array
const MMapControls = vuefy.entity(mappable.MMapControls, [position, orientation])
This isn’t the best option, because it impacts the developer experience. Developers would have to search for and define the types for entity components themselves. It would be better if the entity itself provided the props declaration.
Thus, a solution similar to overrides emerged — options. The working principle is similar. There is a optionsKeyVuefy Symbol key that we need for the static field of the entity class. The field contains the value in the form of a props declaration.
Example for MMapZoomControl:
// Options object for Vue component

const MMapZoomControlVuefyOptions: CustomVuefyOptions<MMapZoomControl> = {
  props: {
    easing: [
      String,
      Object,
      Function,
    ] as TVue.PropType<EasingFunctionDescription>,
    duration: { type: Number, default: defaultProps.duration },
  },
};

class MMapZoomControl extends MMapGroupEntity<MMapZoomControlProps> {
  static [optionsKeyVuefy] = MMapZoomControlVuefyOptions; // connecting options to the entity
  ...
}
We’ve left developers the option to specify props, because entities from third-party packages may not provide options, and in this case developers would still have to define them on their own. This is where the significant differences between reactify and vuefy end.
What we got as a result
We compared the amount of code we had before and after we applied the new mechanism. Here’s what we got:
| JS API | React | Vue | |
|---|---|---|---|
| Before | 28 000 | 8 000 | ~8 000 |
| After | 28 000 | 600 | 750 |
The amount of JS API code didn’t change, but it decreased by a factor of 10 for each framework. This means that the bundle size loaded onto the user’s page has also decreased.
In addition, the wrappers enabled our team to successfully integrate the JS API with React and Vue. This allowed us to expand the potential user audience and simplify the use of our library in various projects. Solving the problem of integration with other frameworks opened up new possibilities for developers and made the JS API more versatile. This approach also enhances framework compatibility for third-party packages, as it automatically converts their entities into components of supported frameworks.